In the world of Kubernetes, managing resources wisely is key to keeping your cluster healthy and your workloads running smoothly. Without proper controls, one application can easily consume more than its fair share of CPU, memory, or pods, leading to resource contention and system instability.
Thankfully, Kubernetes provides powerful tools to enforce resource limits at the namespace level, allowing teams to share the cluster fairly. In this blog post, we’ll explore two important tools for namespace-level resource management:
- Resource Quotas
- Limit Ranges
Let’s dive in and see how they work, with practical examples to help you get started.
🔹 What Are Resource Quotas in Kubernetes?
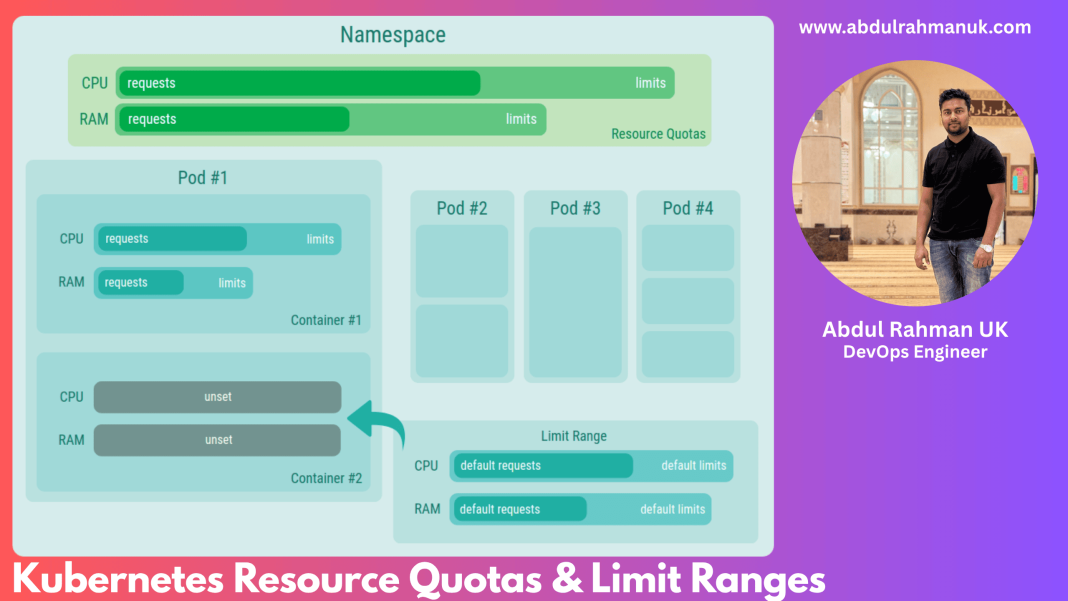
Resource Quotas let administrators cap the total amount of resources that a specific namespace can use. Think of it as setting a budget for pods, CPU, memory, and other compute resources.
📌 Why Use Resource Quotas?
- Define clear usage boundaries per namespace.
- Monitor and track resource usage in real-time.
- Automatically block workloads that try to exceed their limits.
🛠 How to Set a Resource Quota
To apply a Resource Quota, create a YAML file and apply it to the relevant namespace.
apiVersion: v1
kind: ResourceQuota
metadata:
  name: resource-quota-example
  namespace: example-namespace
spec:
  hard:
    pods: "1"
    requests.cpu: "2"
    requests.memory: "5Gi"
    limits.cpu: "4"
    limits.memory: "10Gi"
Then apply it using:
kubectl apply -f resource-quota.yaml💡 This will limit the example-namespace to 1 pod, 2 CPU requests, 5Gi of memory requests, and caps CPU and memory usage at 4 CPUs and 10Gi, respectively.
✅ Verifying the Resource Quota
Check if the quota has been successfully applied:
kubectl get resourcequota resource-quota-example -n example-namespaceOr to get detailed info:
kubectl describe ns example-namespaceSample output:
Resource         Used  Hard
limits.cpu       0     4
limits.memory    0     10Gi
pods             0     1
requests.cpu     0     2
requests.memory  0     5Gi
🔍 Testing Quota Enforcement
Let’s try deploying more pods than allowed to see the quota in action.
Deployment with 2 replicas (but the quota allows only 1):
apiVersion: apps/v1
kind: Deployment
metadata:
  name: quota-test
  namespace: example-namespace
  labels:
    app: deployment-label
spec:
  replicas: 2
  selector:
    matchLabels:
      app: deployment-label
  template:
    metadata:
      labels:
        app: deployment-label
    spec:
      containers:
      - name: nginx-deploy
        image: nginx:latest
        resources:
          requests:
            cpu: 100m
            memory: 100Mi
          limits:
            cpu: 100m
            memory: 100Mi
Apply the deployment:
kubectl apply -f deploy.yaml
Check the pod status:
kubectl get all -n example-namespace
ou’ll see something like:
Warning FailedCreate pods "quota-test-xxxx" is forbidden: exceeded quota: resource-quota-example...
The second pod fails to start—exactly what we want. The quota is working as intended!
🔹 What Are Limit Ranges in Kubernetes?
While Resource Quotas set overall namespace limits, Limit Ranges control the default and maximum/minimum resource limits for each pod, container, or PVC. This ensures no single pod or container hogs cluster resources.
📌 Why Use Limit Ranges?
- Enforce consistent resource consumption across deployments.
- Prevent resource abuse by setting sensible defaults.
- Ensure all pods have a minimum allocation for healthy operation.
🛠 How to Set a Limit Range
Create a limit-range.yaml file:
apiVersion: v1
kind: LimitRange
metadata:
  name: limit-range-example
  namespace: example-namespace
spec:
  limits:
  - type: Pod
    max:
      cpu: "2"
      memory: "4Gi"
    min:
      cpu: "200m"
      memory: "256Mi"
    maxLimitRequestRatio:
      cpu: "4"
      memory: "8"
  - type: Container
    default:
      cpu: "500m"
      memory: "512Mi"
    defaultRequest:
      cpu: "250m"
      memory: "256Mi"
    max:
      cpu: "1"
      memory: "1Gi"
    min:
      cpu: "100m"
      memory: "128Mi"
    maxLimitRequestRatio:
      cpu: "2"
      memory: "4"
  - type: PersistentVolumeClaim
    max:
      storage: "10Gi"
    min:
      storage: "1Gi"
    default:
      storage: "5Gi"
    defaultRequest:
      storage: "2Gi"
    maxLimitRequestRatio:
      storage: "2"
Apply it:
kubectl apply -f limit-range.yaml
🧠 Limit Ranges apply defaults automatically to pods if you forget to specify them!
✅ Verifying the Limit Range
Use the following commands:
kubectl describe limitrange limit-range-example -n example-namespace
kubectl describe ns example-namespace
You’ll see something like:
Type                   Resource  Min    Max   Default Request  Default Limit  Max Limit/Request Ratio
Pod                    cpu       200m   2     -                -              4
Pod                    memory    256Mi  4Gi   -                -              8
Container              cpu       100m   1     250m             500m           2
Container              memory    128Mi  1Gi   256Mi            512Mi          4
PersistentVolumeClaim  storage   1Gi    10Gi  2Gi              5Gi            2
🔍 Testing the Limit Range in Action
Create a deployment without resource specs and watch the defaults kick in:
apiVersion: apps/v1
kind: Deployment
metadata:
  name: limit-test
  namespace: example-namespace
  labels:
    app: deployment-label
spec:
  replicas: 1
  selector:
    matchLabels:
      app: deployment-label
  template:
    metadata:
      labels:
        app: deployment-label
    spec:
      containers:
      - name: nginx-deploy
        image: nginx:latest
Apply it:
kubectl apply -f deploy.yaml
Now describe the pod and you’ll notice the resource requests and limits are automatically applied based on the LimitRange!
🧩 Final Thoughts
Namespace-level resource control in Kubernetes is not just a best practice—it’s a necessity for scalable and stable clusters.
✅ Use Resource Quotas to enforce overall limits per namespace.
✅ Use Limit Ranges to set smart defaults and enforce per-container or per-pod limits.
By combining both, you ensure fair resource distribution, avoid noisy neighbor problems, and maintain consistent workload performance across your Kubernetes environment.
💬 Got questions about resource management in Kubernetes?
📩 Drop a comment below or connect with me for more DevOps tips and Kubernetes best practices.
Happy Clustering! 🚀


