In today’s cloud-native environments, securely managing secrets such as database credentials, API tokens, and certificates is vital. For Kubernetes workloads running on Azure Kubernetes Service (AKS), Azure Key Vault provides a highly secure and centralized way to manage secrets. When integrated with the Kubernetes Secrets Store CSI (Container Storage Interface) driver and Azure Workload Identity, secrets can be dynamically and securely injected into pods with automatic rotation support. This blog demonstrates how to set up this integration in a production-grade environment.
🌍 Use Case Scenario
Problem: In most Kubernetes applications, secrets are hardcoded or statically injected, requiring pod restarts when secrets like database passwords are rotated. This creates downtime and maintenance overhead.
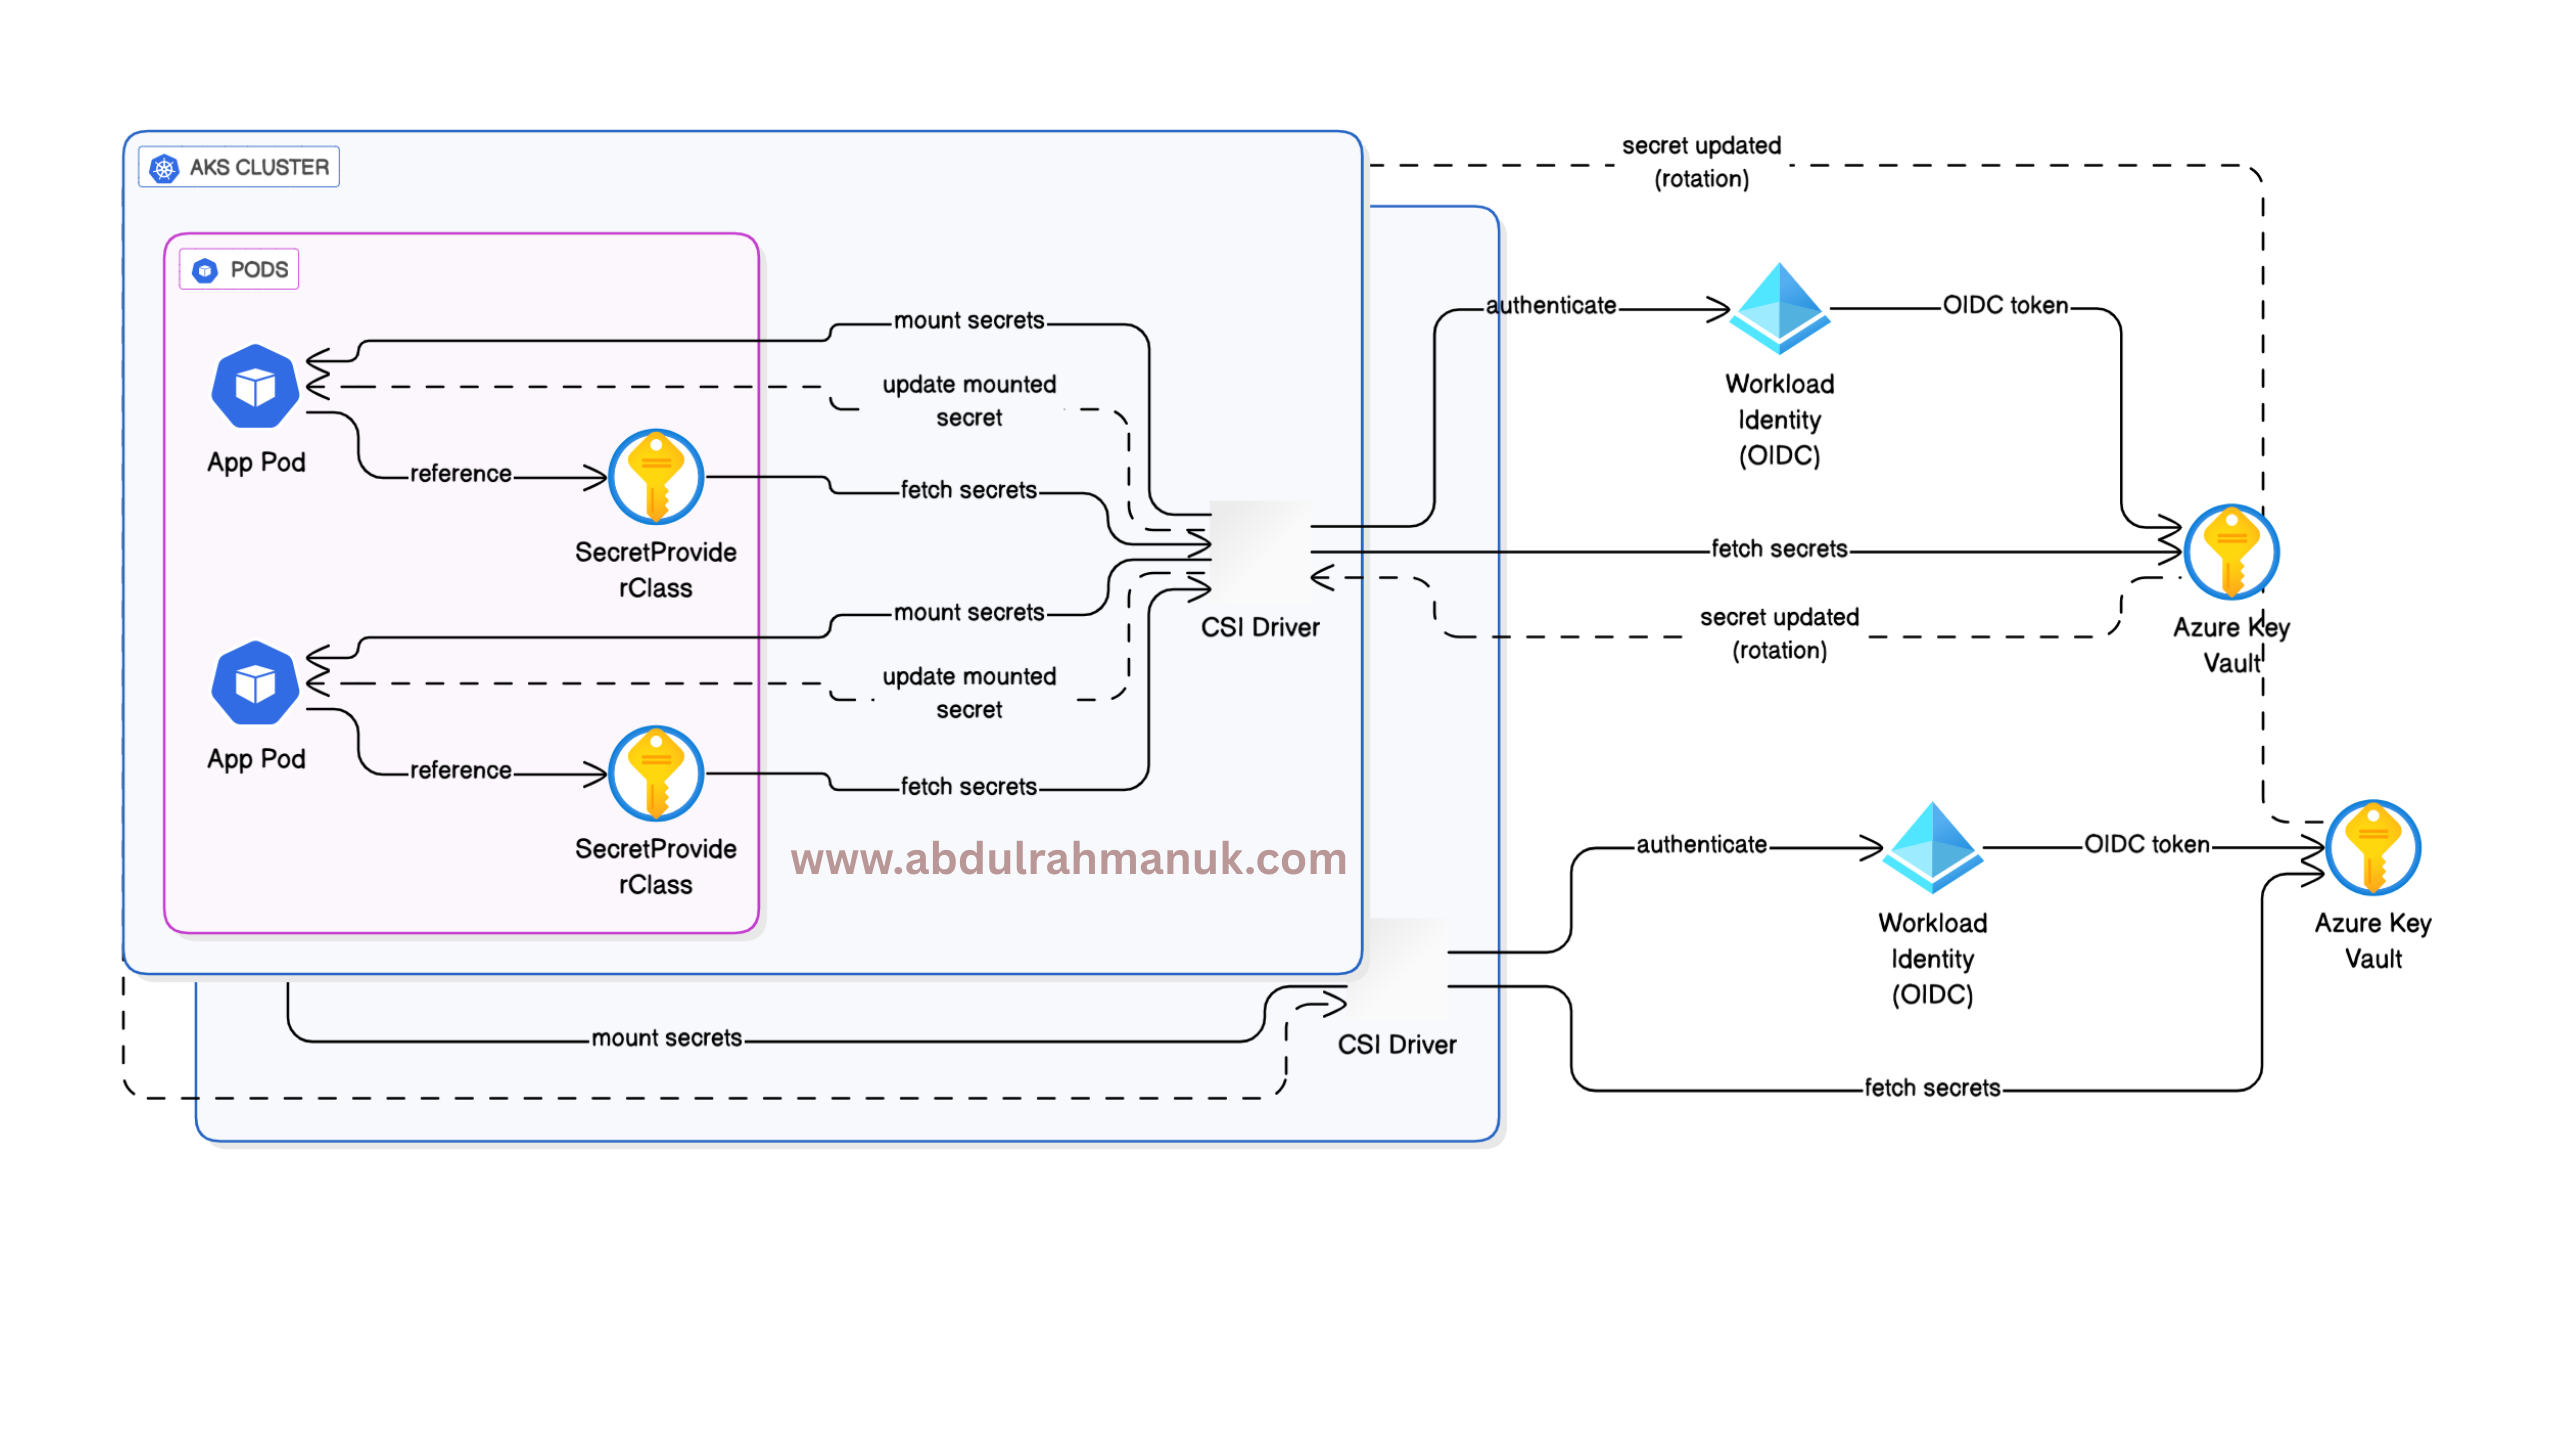
Solution: Integrate AKS with Azure Key Vault using the CSI driver and enable automatic secret rotation. Secrets will be mounted into pods and updated dynamically without restarting the pod, ensuring zero-downtime secret updates.
⚙️ Architecture Overview
The architecture includes:
- AKS Cluster
- Azure Key Vault
- Workload Identity (OIDC) for secure identity management
- CSI Secrets Store Driver for mounting secrets
- Auto-Rotation of secrets via polling

📊 Step-by-Step Implementation
To create a AKS cluster using CLI please follow this blog: AKS Cluster Setup Using Azure CLI with OIDC & Azure Key Vault Integration
1. Enable OIDC and Workload Identity on exiting AKS cluster
az aks update \
  --name <cluster-name> \
  --resource-group <rg> \
  --enable-oidc-issuer \
  --enable-workload-identity

To enable Azure Key Vault CSI driver after the cluster is created:
az aks enable-addons \
  --addons azure-keyvault-secrets-provider \
  --name <cluster-name> \
  --resource-group <rg>
You can verify through azure portal under your kuberenets cluster dashboard “Security Configuration” tab

Verify that each node in your cluster’s node pool has a Secrets Store CSI Driver pod and a Secrets Store Provider Azure pod running
kubectl get pods -n kube-system -l 'app in (secrets-store-csi-driver,secrets-store-provider-azure)' -o wide
1.2 Keyvault creation and configuration
Create a key vault with Azure role-based access control (Azure RBAC).
az keyvault create -n my-demo-k8s-key-vault -g keyvault-demo -l eastus --enable-rbac-authorization2. Create a Managed Identity
Please export following values on your terminal, make sure you have added your subscription id..etc
export SUBSCRIPTION_ID=fe4a1fdb-6a1c-4a6d-a6b0-dbb12f6a00f8
export RESOURCE_GROUP=keyvault-demo
export UAMI=azurekeyvaultsecretsprovider-keyvault-demo-cluster
export KEYVAULT_NAME=my-demo-k8s-key-vault
export CLUSTER_NAME=keyvault-demo-cluster

az account set --subscription $SUBSCRIPTION_IDTo Create a managed identity, following azure cli command
az identity create --name $UAMI --resource-group $RESOURCE_GROUP

export USER_ASSIGNED_CLIENT_ID="$(az identity show -g $RESOURCE_GROUP --name $UAMI --query 'clientId' -o tsv)"

export IDENTITY_TENANT=$(az aks show --name $CLUSTER_NAME --resource-group $RESOURCE_GROUP --query identity.tenantId -o tsv)Create a role assignment that grants the workload ID access the key vault
export KEYVAULT_SCOPE=$(az keyvault show --name $KEYVAULT_NAME --query id -o tsv)

az role assignment create --role "Key Vault Administrator" --assignee $USER_ASSIGNED_CLIENT_ID --scope $KEYVAULT_SCOPEGet the AKS cluster OIDC Issuer URL
export AKS_OIDC_ISSUER="$(az aks show --resource-group $RESOURCE_GROUP --name $CLUSTER_NAME --query "oidcIssuerProfile.issuerUrl" -o tsv)"

echo $AKS_OIDC_ISSUER3. Annotate Kubernetes ServiceAccount
export SERVICE_ACCOUNT_NAME="workload-identity-sa"
export SERVICE_ACCOUNT_NAMESPACE="default" cat <<EOF | kubectl apply -f -
apiVersion: v1
kind: ServiceAccount
metadata:
name: ${SERVICE_ACCOUNT_NAME}
namespace: ${SERVICE_ACCOUNT_NAMESPACE}
annotations:
azure.workload.identity/client-id: "${USER_ASSIGNED_CLIENT_ID}"
EOF
Or If above syntax confusing, SA direct yaml syntax given below fill details accordingly
apiVersion: v1
kind: ServiceAccount
metadata:
  name: workload-identity-sa
  annotations:
    azure.workload.identity/client-id: <your-client-id>
namespace: defaultSetup Federation
export FEDERATED_IDENTITY_NAME="aksfederatedidentity"

az identity federated-credential create --name $FEDERATED_IDENTITY_NAME --identity-name $UAMI --resource-group $RESOURCE_GROUP --issuer ${AKS_OIDC_ISSUER} --subject system:serviceaccount:${SERVICE_ACCOUNT_NAMESPACE}:${SERVICE_ACCOUNT_NAME}4. Create SecretProviderClass
cat <<EOF | kubectl apply -f -
# This is a SecretProviderClass example using workload identity to access your key vault
apiVersion: secrets-store.csi.x-k8s.io/v1
kind: SecretProviderClass
metadata:
  name: azure-kvname-wi # needs to be unique per namespace
spec:
  provider: azure
  parameters:
    usePodIdentity: "false"
    clientID: "${USER_ASSIGNED_CLIENT_ID}" # Setting this to use workload identity
    keyvaultName: ${KEYVAULT_NAME}       # Set to the name of your key vault
    cloudName: ""                         # [OPTIONAL for Azure] if not provided, the Azure environment defaults to AzurePublicCloud
    objects:  |
      array:
        - |
          objectName: DB-Password         # Set to the name of your secret
          objectType: secret              # object types: secret, key, or cert
          objectVersion: ""
    tenantId: "${IDENTITY_TENANT}"        # The tenant ID of the key vault
EOFOr use below direct yaml secretproviderclass and fill details accordingly
apiVersion: secrets-store.csi.x-k8s.io/v1
kind: SecretProviderClass
metadata:
  name: azure-kvname-wi
spec:
  provider: azure
  parameters:
    keyvaultName: <your-kv-name>
    tenantId: <your-tenant-id>
    clientID: <your-client-id>
    objects: |
      array:
        - objectName: DB-Password
          objectType: secret
          objectVersion: ""
5. Deploy a Workload (e.g., BusyBox Test Pod)
apiVersion: apps/v1
kind: Deployment
metadata:
  name: busybox-secrets
spec:
  replicas: 1
  selector:
    matchLabels:
      app: busybox-secrets
  template:
    metadata:
      labels:
        app: busybox-secrets
        azure.workload.identity/use: "true"
    spec:
      serviceAccountName: workload-identity-sa
      containers:
        - name: busybox
          image: registry.k8s.io/e2e-test-images/busybox:1.29-4
          command: ["/bin/sleep", "10000"]
          volumeMounts:
            - name: secrets-store-vol
              mountPath: "/mnt/secrets-store"
              readOnly: true
      volumes:
        - name: secrets-store-vol
          csi:
            driver: secrets-store.csi.k8s.io
            readOnly: true
            volumeAttributes:
              secretProviderClass: azure-kvname-wi
              rotationPollInterval: "30s"
Now you can exec into the pod and verify the secret are mounted into the container. You can run following command to verify the same

kubectl exec <pod> -- ls /mnt/secrets-store/
kubectl exec <pod> -- cat /mnt/secrets-store/DB-Password⟳ Enable Auto-Rotation of Secrets
Run the following command to enable the rotation feature:
az aks addon update \
--resource-group <rg> \
--name <cluster-name> \
--addon azure-keyvault-secrets-provider \
--enable-secret-rotation \
--rotation-poll-interval 30s
Verify it with:
kubectl -n kube-system describe ds aks-secrets-store-csi-driver
Ensure the arguments include:
--enable-secret-rotation=true--rotation-poll-interval=30s
To work Azure Key Vault auto rotation in deployment, Make sure following settings are there in first
1) Under SecretProviderClass Leave objectVersion blank
2) Add to volume attributes on deployment file: rotationPollInterval
volumeAttributes:
secretProviderClass: azure-kvname-wi
rotationPollInterval: "30s"🔍 Testing the Rotation
- Manually update the secret version in Azure Key Vault.
- Wait for
rotationPollInterval. - Check the mounted file inside the pod:
kubectl exec <pod> -- ls /mnt/secrets-store/
kubectl exec <pod> -- cat /mnt/secrets-store/DB-Password
- Observe that the new value is reflected without restarting the pod.

📗 Best Practices
- Avoid
subPathin volume mounts (breaks rotation). - Ensure your application reads secrets from file, not env vars.
- Consider implementing file watchers for dynamic config reloads.
- Monitor CSI driver logs:
kubectl logs ds/aks-secrets-store-csi-driver -n kube-system
🌟 Conclusion
With Azure Key Vault, CSI driver, and workload identity, you can achieve secure, automated, and zero-downtime secret management for your AKS workloads. Auto-rotation ensures credentials like DB passwords can be updated without disrupting live applications.
Feel free to follow me on LinkedIn and share your thoughts. For a complete YAML reference or demo repo, connect with me or leave a comment!


